Maintaining Your Sanity in a Large Slack Instance
If you have ever worked in a large Slack instance, you know some of the pains that come along with it. The random @here or @channel and the subsequent responses admonishing the people for alerting 6000 of their closest friends. The pinging from channels that you only slightly care about. The people who forget that the chat instance is still a professional setting.
In our Slack instance, @here and @channel are enabled. They are useful in small channels, if used judiciously. Unfortunately, they cause a ruckus in larger channels, but people tend to learn pretty quickly not to abuse them. In my opinion this is an area where Slack can improve, by only allowing channel owners the ability to use @here and @channel. The could also provide another keyword that allows people to target the owners of a channel such as a @owners keyword.
In the two years or so that I have been working in a large Slack instance, I have learned a few things and thought I would share. Here are a few of my best practices when working with slack.
Organize Your Channels
Channels will fall into one of a few categories:
Lifeblood Channels
These channels are the channels you live in day in and day out. You want to know immediately when someone posts in these channels. A good post here will make your day, a bad post here could ruin a weekend.
Informational Channels
These channels provide useful information to you and when you get some time, you will catch up on the channel and you may chime in from time to time. You joined this channel because you have a vested interest in the topic at hand, but it may not affect your day to day work.
Corporate Channels
These channels are used by various levels of management to share information. They tend to have surges of information and then a lot of downtime. Usually this is required reading, but can be done at your leisure.
The Required Channel
You can’t leave this channel. Hopefully you have good admins that lock down who can post here. This is hopefully just a Corporate Channel you cannot leave.
The ignored channels
These channels have nothing to do with your job and, depending on the size of your slack instance, you may not even know they exist.
Once you’ve decided what category applies to a given channel you can then customize how that channel is displayed to you. Your lifeblood channels should be favorited by clicking the star in the top left corner of the channel. You can also star any direct message conversations you have with colleagues that you work with on a daily basis.
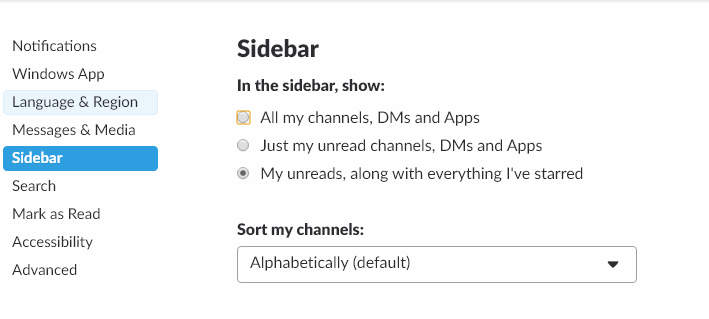
With your lifeblood channels and colleagues starred, you can now configure slack to always display those channels on the sidebar and hide all others. Under preferences, go to the sidebar options and select the My Unreads, along with everything I've starred option:
All other channels will only display when there is new content in those channels. For those required, corporate, or information channels where there are a lot of posts, but only mildly useful content, you can mute those channels, to prevent extra alerts from appearing on your slack client.
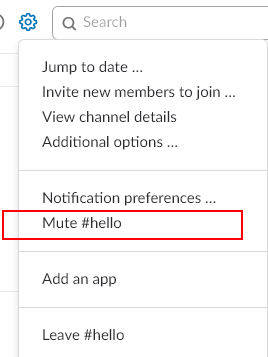
Muting a channel will prevent it from appearing unread, but you may still get badges by the channel for @here or @channel messages. For channels where @here/@channel get annoying, you can even mute those alerts in the channel notification preferences:

You can even star a channel you have muted, so it will appear in your list at all times, but you will never receive a notification from the channel. This is useful for those chatty channels that you just want to check in with from time to time.
Manage Your Alerts
If you don’t setup your alerts properly in Slack, your UI will be a mishmash of channels with various numbers by them and a whole bunch of bolded channels which you have joined over the course of doing business.
My recommendation is to only configure notifications for Direct Message, mentions & keywords. Again, this is under your preferences in the notifications section:

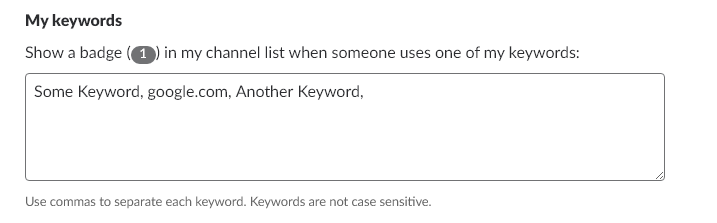
Keywords
Keywords are an awesome feature of Slack that provide notifications based on keywords. You can configure keywords to keep you abreast of others talking about your feature or product across your company. Any channel to which you belong where a keyword is mentioned will result in a notification. This is managed under the notifications section of your slack preferences.
Slack is a very useful tool, but it can get unwieldy fast. Using the settings I outlined above, your large slack instance will be more productive and less of a distraction.
Do you have a tip for making Slack more productive or less of a distraction? If so, share it below.
Special Folder Enum Values on Windows and Mac in .Net Core
On Windows it is common to use Environment.SpecialFolder to access certain folders instead of having to hard code the paths or write the appropriate lookup code for them. Now that code is being ported to Mac using .Net core, I thought I would document the various values that appear for the special folders when running .Net Core code on the Mac. Below is a table that contains the data for a user whose username is john on both the Windows Machine and the Mac OSX machine.
| Enum Value | Windows Value | Mac Value |
|---|---|---|
| AdminTools | C:\Users\john\AppData\Roaming\Microsoft\Windows\Start Menu\Programs\Administrative Tools | |
| ApplicationData | C:\Users\john\AppData\Roaming | /Users/john/.config |
| CDBurning | C:\Users\john\AppData\Local\Microsoft\Windows\Burn\Burn | |
| CommonAdminTools | C:\ProgramData\Microsoft\Windows\Start Menu\Programs\Administrative Tools | |
| CommonApplicationData | C:\ProgramData | /usr/share |
| CommonDesktopDirectory | C:\Users\Public\Desktop | |
| CommonDocuments | C:\Users\Public\Documents | |
| CommonMusic | C:\Users\Public\Music | |
| CommonOemLinks | ||
| CommonPictures | C:\Users\Public\Pictures | |
| CommonProgramFiles | C:\Program Files\Common Files | |
| CommonProgramFilesX86 | C:\Program Files (x86)\Common Files | |
| CommonPrograms | C:\ProgramData\Microsoft\Windows\Start Menu\Programs | |
| CommonStartMenu | C:\ProgramData\Microsoft\Windows\Start Menu | |
| CommonStartup | C:\ProgramData\Microsoft\Windows\Start Menu\Programs\Startup | |
| CommonTemplates | C:\ProgramData\Microsoft\Windows\Templates | |
| CommonVideos | C:\Users\Public\Videos | |
| Cookies | C:\Users\john\AppData\Local\Microsoft\Windows\INetCookies | |
| Desktop | C:\Users\john\Desktop | /Users/john/Desktop |
| DesktopDirectory | C:\Users\john\Desktop | /Users/john/Desktop |
| Favorites | C:\Users\john\Favorites | /Users/john/Library/Favorites |
| Fonts | C:\WINDOWS\Fonts | /Users/john/Library/Fonts |
| History | C:\Users\john\AppData\Local\Microsoft\Windows\History | |
| InternetCache | C:\Users\john\AppData\Local\Microsoft\Windows\INetCache | /Users/john/Library/Caches |
| LocalApplicationData | C:\Users\john\AppData\Local | /Users/john/.local/share |
| LocalizedResources | ||
| MyComputer | ||
| MyDocuments | C:\Users\john\Documents | /Users/john |
| MyDocuments | C:\Users\john\Documents | /Users/john |
| MyMusic | C:\Users\john\Music | /Users/john/Music |
| MyPictures | C:\Users\john\Pictures | /Users/john/Pictures |
| MyVideos | C:\Users\john\Videos | |
| NetworkShortcuts | C:\Users\john\AppData\Roaming\Microsoft\Windows\Network Shortcuts | |
| PrinterShortcuts | ||
| ProgramFiles | C:\Program Files | /Applications |
| ProgramFilesX86 | C:\Program Files (x86) | |
| Programs | C:\Users\john\AppData\Roaming\Microsoft\Windows\Start Menu\Programs | |
| Recent | C:\Users\john\AppData\Roaming\Microsoft\Windows\Recent | |
| Resources | C:\WINDOWS\resources | |
| SendTo | C:\Users\john\AppData\Roaming\Microsoft\Windows\SendTo | |
| StartMenu | C:\Users\john\AppData\Roaming\Microsoft\Windows\Start Menu | |
| Startup | C:\Users\john\AppData\Roaming\Microsoft\Windows\Start Menu\Programs\Startup | |
| System | C:\WINDOWS\system32 | /System |
| SystemX86 | C:\WINDOWS\SysWOW64 | |
| Templates | C:\Users\john\AppData\Roaming\Microsoft\Windows\Templates | |
| UserProfile | C:\Users\john | /Users/john |
| Windows | C:\WINDOWS |
The code for this is pretty straightforward. I enumerate over the possible enum values and output them to a CSV.
static void Main(string[] args)
{
    StringBuilder sb = new StringBuilder();
    foreach (Environment.SpecialFolder sf in Enum.GetValues(typeof(System.Environment.SpecialFolder)))
    {
        sb.AppendLine($"{sf.ToString()}, {Environment.GetFolderPath(sf)}");
    }
    var path = System.IO.Path.GetDirectoryName(Assembly.GetExecutingAssembly().FullName);
    var fileName = GetFileName();
    var filePath = System.IO.Path.Combine(path, $"{fileName}.csv");
    System.IO.File.WriteAllText(filePath, sb.ToString());
}

static string GetFileName()
{
    if (RuntimeInformation.IsOSPlatform(OSPlatform.Windows))
        return "Win";
    else if (RuntimeInformation.IsOSPlatform(OSPlatform.OSX))
        return "OSX";

    return "Linux";
}
If you just want to pull the code and run it, I have a copy up on GitHub. As you can see, some special folders have a direct mapping to Mac OSX and others do not. When you think about it, they all make sense. As long as you understand the values you will get back in the various scenarios, you can use the values that are appropriate for your application.
Dealing with Duplicate Assembly Attributes in .Net Core
When migrating a project from .Net Framework to .Net Standard, you may run into issues where you get duplicate assembly attributes. An example you might see is something like this:
Severity	Code	Description	Project	File	Line	Suppression State
Error	CS0579	Duplicate 'System.Reflection.AssemblyTitleAttribute' attribute MyProject
D:\Dev\MyProject\obj\Debug\netstandard2.0\MyProject.AssemblyInfo.cs	20	N/A
I ran into this because I have an AssemblyInfo.cs with an AssemblyTitleAttribute and the .Net Standard project is also generating the AssemblyTitleAttribute. After reading through some GitHub issues, it appears there are two ways around this issue.
First, I could remove the AssemblyInfo.cs that I already had in my project and add the appropriate attributes to the csproj file. Since I am converting a .Net Framework project in place with a new solution and csproj file, this will not work for me. I am left with the second option.
Add settings to the csproj file to indicate that the various attributes should not be generated. Here is an example csproj file with a few of the attributes disabled:
<Project Sdk="Microsoft.NET.Sdk">
    <PropertyGroup>
        <TargetFramework>netstandard2.0</TargetFramework>
        <GenerateAssemblyConfigurationAttribute>false</GenerateAssemblyConfigurationAttribute>
        <GenerateAssemblyDescriptionAttribute>false</GenerateAssemblyDescriptionAttribute>
        <GenerateAssemblyProductAttribute>false</GenerateAssemblyProductAttribute>
        <GenerateAssemblyTitleAttribute>false</GenerateAssemblyTitleAttribute>
    </PropertyGroup>
</Project>
Once those settings are added to the csproj file, everything compiles and there are no duplicate attribute errors.
Simple Interprocess Communication in .Net Core using Protobuf
In the past, I have used WCF to handle inter-process communication (IPC) between various separate components of my client applications. Since .Net Core doesn’t yet support WCF server side code, I had to look into alternatives. The two main approaches to this that I have found are TCPServer and NamedPipeServerStream. Others have covered the TCP approach, so I wanted to see what could be done with the NamedPipeServerStream.
I started reading the MSDN documentation on the basics of IPC with named pipes and found that it worked with .Net Core 2.0 with no changes. This is the true benefit of .Net Core. An older article about IPC is still completely relevant even though the code is now running on a Mac instead of a Windows Machine. One thing I didn’t like too much about that article was the StreamString class and I wanted to see what I could do with plain old C# objects.
I decided to start try out Protobuf. I had heard about it in the past and figured this would be a good foray into learning more about it. Since I was developing a client and a server, I decided I would start with the API and put that into a shared class project. So I created a Common project, added a reference to protobuf, and defined a Person class in there:
[ProtoContract]
public class Person
{
    [ProtoMember(1)]
    public string FirstName { get; set; }

    [ProtoMember(2)]
    public string LastName { get; set; }
}
Decorating the class with the protobuf attributes was all I had to do. Now that it is defined in the common class, I could write a server to serve up the data and a client to consume the data, each referencing the Common library. Next up, I created the server. Following the linked example above, I defined the server console application as:
static void Main(string[] args)
{
    Console.WriteLine("Starting Server");

    var pipe = new NamedPipeServerStream("MyTest.Pipe", PipeDirection.InOut);
    Console.WriteLine("Waiting for connection....");
    pipe.WaitForConnection();

    Console.WriteLine("Connected");

    Serializer.Serialize(pipe, new Person() { FirstName="Janey", LastName = "McJaneFace" });
    pipe.Disconnect();
}
I am simply defining the NamedPipeServerStream to listen on a pipe named “MyTest.Pipe”. For now, the code immediately returns an object to the connection, that can be read from the client side. This is achieved using protobuf’s Serializer.Serialize method. To define the client, I need to use a NamedPipeClientStream to connect to the same pipe.
static void Main(string[] args)
{
    Console.WriteLine("Client");
    var pipe = new NamedPipeClientStream(".", "MyTest.Pipe", PipeDirection.InOut, PipeOptions.None);
    Console.WriteLine("Connecting");
    pipe.Connect();
    var person = Serializer.Deserialize<Person>(pipe);
    Console.WriteLine($"Person: {person.FirstName} {person.LastName}");
    Console.WriteLine("Done");
}
Once I connect, I then use protobuf’s Serializer.Deserialize method to read from the stream and deserialize the person object. That’s it. I am passing data from one process to another in .Net core. If you are using .Net Core 1.x, you will need to explicitly add a reference to the System.IO.Pipes nuget package. And for both 1.x and 2.0 .net core, you need to add a nuget reference to protobuf.
Even though this is a basic example, it does demonstrate the functionality and could be easily extended to handle much more complex scenarios.
A fully working solution for this can be found as a sample GitHub project. There appear to be other .Net Core/Standard projects(1, 2) attempting to better facilitate IPC and it will be interesting to see how they mature with the ecosystem. My hope is that some flavor of WCF server makes its way over to .Net core, to make porting code that much easier.
Minified Javascript not Deploying With .Net Core Projects Created in Visual Studio 2017
I was working on a very simple site that I created using the new .Net Core project templates in Visual Studio 2017. Everything worked great on my machine, but, when I deployed to Azure, none of my custom javascript or CSS were working properly. What gives?
After doing some digging, I found that the deployed site was trying to use the site.min.js and the site.min.css, but those files weren’t deployed to Azure. After googling a bit, I found that it was probably an issue with my bundling and when I opened the bundleconfig.json, Visual Studio tried to be helpful:
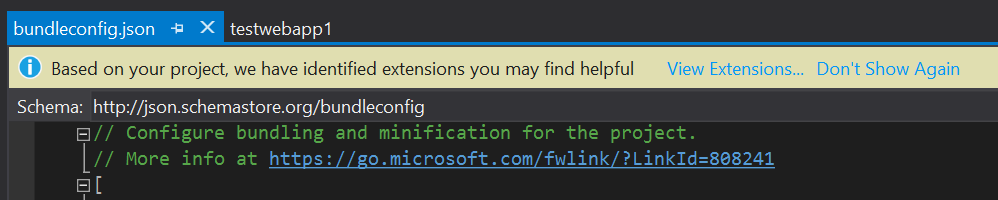
Of course, I ignored the extension warning and comment at first, but the extension that is missing solves the exact problem I was having. The link in the comments has an article on how to enable and configure bundling in ASP.NET Core.
So, while the Visual Studio team could work on making this a better experience, I have to remember to read the warnings and comments that are left in the generated code. They are there for a reason.
Zero to CI in Thirty Minutes Or Less (Or its free!)
One of the biggest complaints I hear from teams about CI is that it is too much work. While getting it perfect can be a lot of work, getting started couldn’t be easier.
I am going to demonstrate continuously building a C# project using Jenkins as our CI host.
To get started we’ll need a machine to be our build agent. I am going to create a VM in Azure to be my build agent. Since I am building a C# project, I am going to choose the template that already has Visual Studio 2017 installed on it. But this could be any machine. It could be an extra machine you have sitting under your desk or a virtual machine in your own datacenter.

Once the machine is created, you can connect to it and install Jenkins. Start by downloading and running the windows installer.
Once installed, a browser window will open that you can use to administer Jenkins. It may open before Jenkins has a chance to start, so you may need to refresh the page. Follow the instructions on the page to unlock Jenkins for first time use.
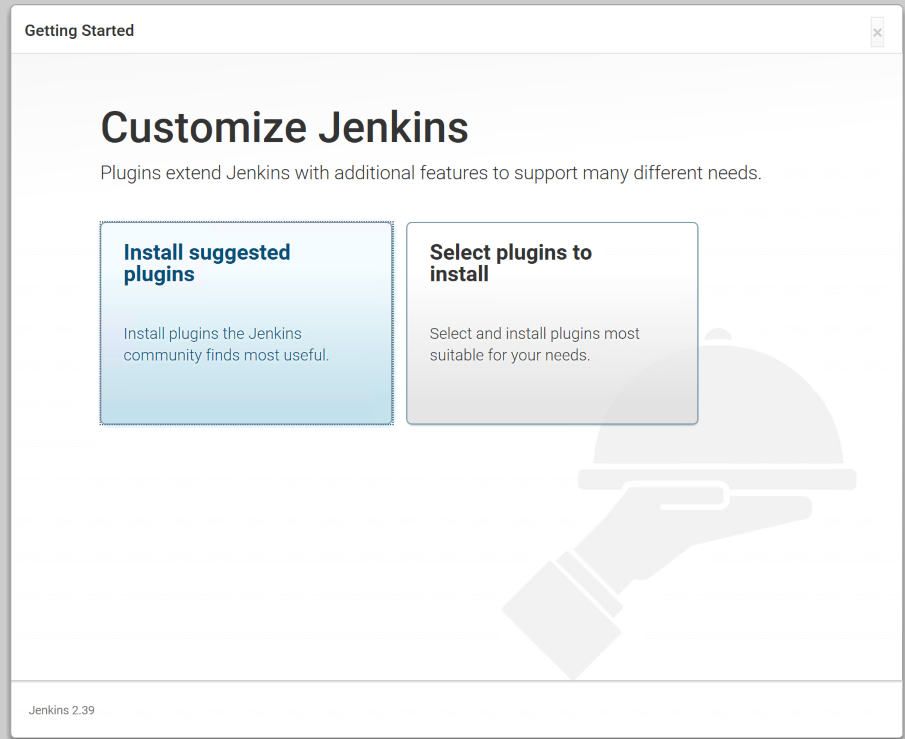
You will be prompted to install plugins. Plugins are the lifeblood of the Jenkins ecosystem and there are plugins to do pretty much everything. You can start by installing the suggested plugins.
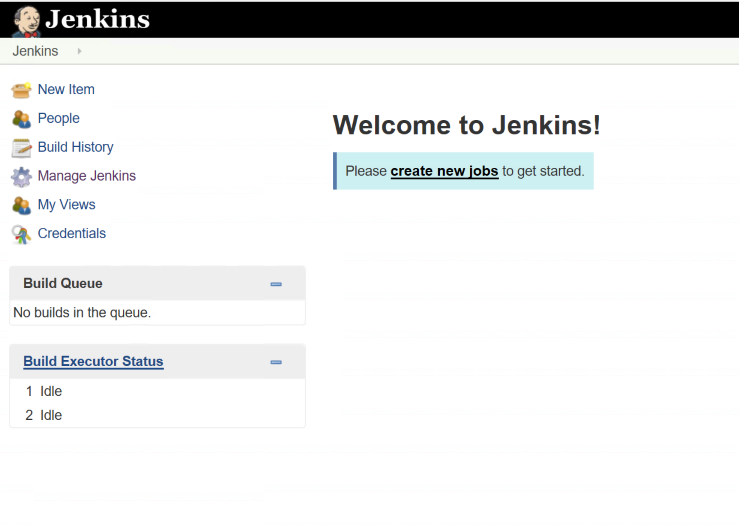
This will install a handful of plugins to get us started. Once complete, you will be asked to setup an admin user. Go through the steps of setting up the user and then you can start using Jenkins. At this point, Jenkins is ready to go.
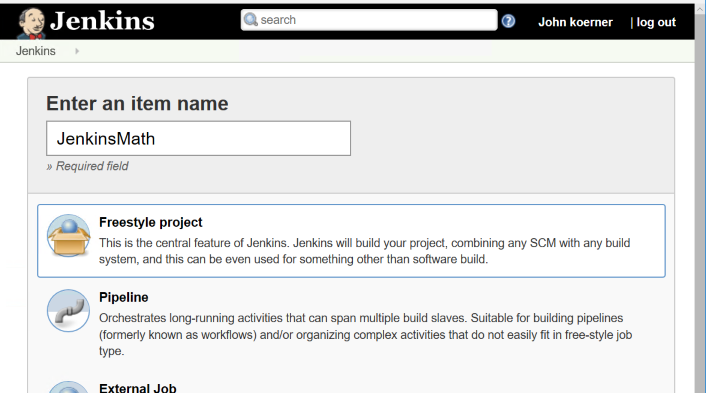
We are going to create a job to build a simple C# library I am hosting on GitHub to demonstrate Jenkins builds. Now we can create a new job and give it a name. The easiest project to configure in Jenkins is a freestyle project. This allows you to do any type of build you want by combining source control and scripts to accomplish your task (along with features from whatever plugins you have installed).
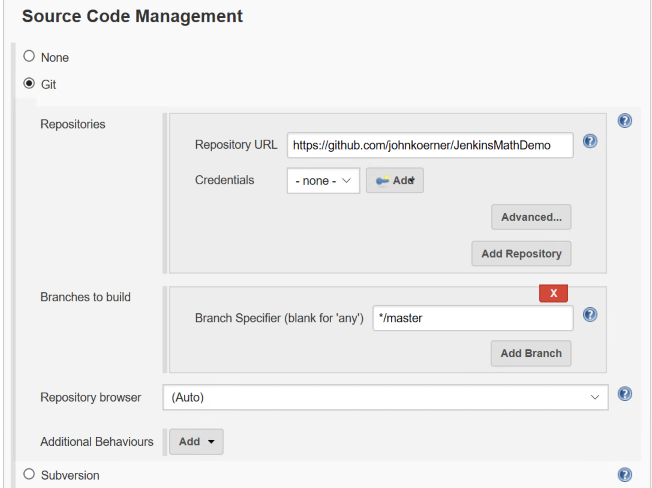
Next, we will configure the project to pull from GitHub and give it a little batch script to build the project and run the tests. In the Source Code Management section, we will select Git and enter our repository URL.
Then in the Build section, we will setup our script to build the project. Since this is a .Net core project and I have the 2017 core tools installed, I can simply specify a batch command with the following script:
dotnet restore
dotnet build
cd UnitTests
dotnet test
Save the job. Then click the Build Now button on the left hand side. This will start a job which will appear in the Build History portion of the page. You can click on the build number to get more information about the build. The most useful information in here is the console. If you click on the Console Output you can see the full console output of your build. Since this is your first build on the machine, you will see information about populating your local cache for the first time and then you should see the project build output, and finally you should see the tests run and see them all pass.
At this point, we have a build server that builds our project on demand, but not continuously. To set that up, we can go back to the project page and select the Configure option. We’ll use the Poll SCM option to configure the job to poll for changes from GitHub every 15 minutes. In the Schedule box, enter the following value
H/15 * * * *
The format for this schedule mainly follows the cron syntax. Clicking on the ? next to the schedule box will give you plenty of examples and information on how you might want to configure your job. Save the job and you are good to go.
You now have a build server that will build within 15 minutes of a change to the repository. Congratulations, you have a CI server. As you can see, getting started with CI is not hard and there is really no excuse for not having some sort of automations around your builds.
FAQ
Q:But John, why did you ignore webhooks?
A: While setting up webhooks is very straightforward, securing a Jenkins installation to be accessible via the internet is another thing altogether. I decided that using polling was a better approach than teaching people to setup an insecure Jenkins installation and having them get hacked. I’ll probably have a few more posts where I cover setting up webhooks for your Jenkins jobs.
Using a CSharp Syntax Rewriter
One interesting feature of the roslyn engine is the CSharpSyntaxRewriter. This is a base class which you can extend that implements the visitor pattern. You simply override the Visit method that is appropriate for your use case and you can rewrite any portion of a syntax tree.
Consider the following code:
public class Foo
{
    public string _bar = "baz";
}
Now, let’s say we want to change "baz" to something else. To do this, we simply implement a new CSharpSyntaxRewriter that overrides the VisitLiteralExpression so that our code is only executed on LiteralExpression syntax nodes. We then check to see if it is a StringLiteralExpression and if it is, then we create a new node.
class LiteralRewriter : CSharpSyntaxRewriter
{
    public override SyntaxNode VisitLiteralExpression(LiteralExpressionSyntax node)
    {
        if (!node.IsKind(SyntaxKind.StringLiteralExpression))
        {
            return base.VisitLiteralExpression(node);
        }

        var retVal = SyntaxFactory.LiteralExpression(SyntaxKind.StringLiteralExpression,
                                                      SyntaxFactory.Literal("NotBaz"));
        return retVal;
    }
}
The rewriter can be passed any SyntaxNode and it will run on that node and its descendants. So, to use this, I can get a SyntaxTree from a SemanticModel that I get from a CSharpCompilation. Here is a full working sample:
var tree = CSharpSyntaxTree.ParseText(@"
  public class Foo
  {
      public string _bar = ""baz"";
  }");
var Mscorlib = MetadataReference.CreateFromFile(typeof(object).Assembly.Location);
var compilation = CSharpCompilation.Create("MyCompilation",
    syntaxTrees: new[] { tree }, references: new[] { Mscorlib });
var model = compilation.GetSemanticModel(tree);
var root = model.SyntaxTree.GetRoot();

var rw = new LiteralRewriter();
var newRoot = rw.Visit(root);

Console.WriteLine(newRoot.GetText());
Console.ReadLine();
As you can see, a rewriter is a quick and easy way to manipulate a syntax node that you have access to. It’s a great tool to use when you have some simple changes you need to make to a syntax tree.
If you have come up with a good use for syntax rewriters, leave a comment below.
Windows Installer Error Codes
My team was recently working on our installer when we ran into a return code from one of our pre-requisites (specifically the Visual C++ 2015 Runtime). From the logs, we found the error code was 0x80070666 and the return code was 0x666 (a newer version of the runtime was installed). We could easily handle this scenario, but we were looking to find an extensive list of return codes for the C++ redistributables and could not easily find them. Eventually we ran across the list of MsiExec.exe and InstMsi.exe Error Messages and figured out why our searches were yielding no results. The error codes in the log files are all in hex and the error codes on the website are all in decimal. So, to help others with this in the future, here is a list of all of the error codes from that link with their hex equivalent.
| Error code | Value | Description | Hex | Error Code |
|---|---|---|---|---|
| ERROR_SUCCESS | 0 | The action completed successfully. | 0x0 | 0x80070000 |
| ERROR_INVALID_DATA | 13 | The data is invalid. | 0xD | 0x8007000D |
| ERROR_INVALID_PARAMETER | 87 | One of the parameters was invalid. | 0x57 | 0x80070057 |
| ERROR_CALL_NOT_IMPLEMENTED | 120 | This value is returned when a custom action attempts to call a function that cannot be called from custom actions. The function returns the value ERROR_CALL_NOT_IMPLEMENTED. Available beginning with Windows Installer version 3.0. | 0x78 | 0x80070078 |
| ERROR_APPHELP_BLOCK | 1259 | If Windows Installer determines a product may be incompatible with the current operating system, it displays a dialog box informing the user and asking whether to try to install anyway. This error code is returned if the user chooses not to try the installation. | 0x4EB | 0x800704EB |
| ERROR_INSTALL_SERVICE_FAILURE | 1601 | The Windows Installer service could not be accessed. Contact your support personnel to verify that the Windows Installer service is properly registered. | 0x641 | 0x80070641 |
| ERROR_INSTALL_USEREXIT | 1602 | The user cancels installation. | 0x642 | 0x80070642 |
| ERROR_INSTALL_FAILURE | 1603 | A fatal error occurred during installation. | 0x643 | 0x80070643 |
| ERROR_INSTALL_SUSPEND | 1604 | Installation suspended, incomplete. | 0x644 | 0x80070644 |
| ERROR_UNKNOWN_PRODUCT | 1605 | This action is only valid for products that are currently installed. | 0x645 | 0x80070645 |
| ERROR_UNKNOWN_FEATURE | 1606 | The feature identifier is not registered. | 0x646 | 0x80070646 |
| ERROR_UNKNOWN_COMPONENT | 1607 | The component identifier is not registered. | 0x647 | 0x80070647 |
| ERROR_UNKNOWN_PROPERTY | 1608 | This is an unknown property. | 0x648 | 0x80070648 |
| ERROR_INVALID_HANDLE_STATE | 1609 | The handle is in an invalid state. | 0x649 | 0x80070649 |
| ERROR_BAD_CONFIGURATION | 1610 | The configuration data for this product is corrupt. Contact your support personnel. | 0x64A | 0x8007064A |
| ERROR_INDEX_ABSENT | 1611 | The component qualifier not present. | 0x64B | 0x8007064B |
| ERROR_INSTALL_SOURCE_ABSENT | 1612 | The installation source for this product is not available. Verify that the source exists and that you can access it. | 0x64C | 0x8007064C |
| ERROR_INSTALL_PACKAGE_VERSION | 1613 | This installation package cannot be installed by the Windows Installer service. You must install a Windows service pack that contains a newer version of the Windows Installer service. | 0x64D | 0x8007064D |
| ERROR_PRODUCT_UNINSTALLED | 1614 | The product is uninstalled. | 0x64E | 0x8007064E |
| ERROR_BAD_QUERY_SYNTAX | 1615 | The SQL query syntax is invalid or unsupported. | 0x64F | 0x8007064F |
| ERROR_INVALID_FIELD | 1616 | The record field does not exist. | 0x650 | 0x80070650 |
| ERROR_INSTALL_ALREADY_RUNNING | 1618 | Another installation is already in progress. Complete that installation before proceeding with this install. | 0x652 | 0x80070652 |
| ERROR_INSTALL_PACKAGE_OPEN_FAILED | 1619 | This installation package could not be opened. Verify that the package exists and is accessible, or contact the application vendor to verify that this is a valid Windows Installer package. | 0x653 | 0x80070653 |
| ERROR_INSTALL_PACKAGE_INVALID | 1620 | This installation package could not be opened. Contact the application vendor to verify that this is a valid Windows Installer package. | 0x654 | 0x80070654 |
| ERROR_INSTALL_UI_FAILURE | 1621 | There was an error starting the Windows Installer service user interface. Contact your support personnel. | 0x655 | 0x80070655 |
| ERROR_INSTALL_LOG_FAILURE | 1622 | There was an error opening installation log file. Verify that the specified log file location exists and is writable. | 0x656 | 0x80070656 |
| ERROR_INSTALL_LANGUAGE_UNSUPPORTED | 1623 | This language of this installation package is not supported by your system. | 0x657 | 0x80070657 |
| ERROR_INSTALL_TRANSFORM_FAILURE | 1624 | There was an error applying transforms. Verify that the specified transform paths are valid. | 0x658 | 0x80070658 |
| ERROR_INSTALL_PACKAGE_REJECTED | 1625 | This installation is forbidden by system policy. Contact your system administrator. | 0x659 | 0x80070659 |
| ERROR_FUNCTION_NOT_CALLED | 1626 | The function could not be executed. | 0x65A | 0x8007065A |
| ERROR_FUNCTION_FAILED | 1627 | The function failed during execution. | 0x65B | 0x8007065B |
| ERROR_INVALID_TABLE | 1628 | An invalid or unknown table was specified. | 0x65C | 0x8007065C |
| ERROR_DATATYPE_MISMATCH | 1629 | The data supplied is the wrong type. | 0x65D | 0x8007065D |
| ERROR_UNSUPPORTED_TYPE | 1630 | Data of this type is not supported. | 0x65E | 0x8007065E |
| ERROR_CREATE_FAILED | 1631 | The Windows Installer service failed to start. Contact your support personnel. | 0x65F | 0x8007065F |
| ERROR_INSTALL_TEMP_UNWRITABLE | 1632 | The Temp folder is either full or inaccessible. Verify that the Temp folder exists and that you can write to it. | 0x660 | 0x80070660 |
| ERROR_INSTALL_PLATFORM_UNSUPPORTED | 1633 | This installation package is not supported on this platform. Contact your application vendor. | 0x661 | 0x80070661 |
| ERROR_INSTALL_NOTUSED | 1634 | Component is not used on this machine. | 0x662 | 0x80070662 |
| ERROR_PATCH_PACKAGE_OPEN_FAILED | 1635 | This patch package could not be opened. Verify that the patch package exists and is accessible, or contact the application vendor to verify that this is a valid Windows Installer patch package. | 0x663 | 0x80070663 |
| ERROR_PATCH_PACKAGE_INVALID | 1636 | This patch package could not be opened. Contact the application vendor to verify that this is a valid Windows Installer patch package. | 0x664 | 0x80070664 |
| ERROR_PATCH_PACKAGE_UNSUPPORTED | 1637 | This patch package cannot be processed by the Windows Installer service. You must install a Windows service pack that contains a newer version of the Windows Installer service. | 0x665 | 0x80070665 |
| ERROR_PRODUCT_VERSION | 1638 | Another version of this product is already installed. Installation of this version cannot continue. To configure or remove the existing version of this product, use Add/Remove Programs in Control Panel. | 0x666 | 0x80070666 |
| ERROR_INVALID_COMMAND_LINE | 1639 | Invalid command line argument. Consult the Windows Installer SDK for detailed command-line help. | 0x667 | 0x80070667 |
| ERROR_INSTALL_REMOTE_DISALLOWED | 1640 | The current user is not permitted to perform installations from a client session of a server running the Terminal Server role service. | 0x668 | 0x80070668 |
| ERROR_SUCCESS_REBOOT_INITIATED | 1641 | The installer has initiated a restart. This message is indicative of a success. | 0x669 | 0x80070669 |
| ERROR_PATCH_TARGET_NOT_FOUND | 1642 | The installer cannot install the upgrade patch because the program being upgraded may be missing or the upgrade patch updates a different version of the program. Verify that the program to be upgraded exists on your computer and that you have the correct upgrade patch. | 0x66A | 0x8007066A |
| ERROR_PATCH_PACKAGE_REJECTED | 1643 | The patch package is not permitted by system policy. | 0x66B | 0x8007066B |
| ERROR_INSTALL_TRANSFORM_REJECTED | 1644 | One or more customizations are not permitted by system policy. | 0x66C | 0x8007066C |
| ERROR_INSTALL_REMOTE_PROHIBITED | 1645 | Windows Installer does not permit installation from a Remote Desktop Connection. | 0x66D | 0x8007066D |
| ERROR_PATCH_REMOVAL_UNSUPPORTED | 1646 | The patch package is not a removable patch package. Available beginning with Windows Installer version 3.0. | 0x66E | 0x8007066E |
| ERROR_UNKNOWN_PATCH | 1647 | The patch is not applied to this product. Available beginning with Windows Installer version 3.0. | 0x66F | 0x8007066F |
| ERROR_PATCH_NO_SEQUENCE | 1648 | No valid sequence could be found for the set of patches. Available beginning with Windows Installer version 3.0. | 0x670 | 0x80070670 |
| ERROR_PATCH_REMOVAL_DISALLOWED | 1649 | Patch removal was disallowed by policy. Available beginning with Windows Installer version 3.0. | 0x671 | 0x80070671 |
| ERROR_INVALID_PATCH_XML | 1650 | The XML patch data is invalid. Available beginning with Windows Installer version 3.0. | 0x672 | 0x80070672 |
| ERROR_PATCH_MANAGED _ADVERTISED_PRODUCT | 1651 | Administrative user failed to apply patch for a per-user managed or a per-machine application that is in advertise state. Available beginning with Windows Installer version 3.0. | 0x673 | 0x80070673 |
| ERROR_INSTALL_SERVICE_SAFEBOOT | 1652 | Windows Installer is not accessible when the computer is in Safe Mode. Exit Safe Mode and try again or try using System Restore to return your computer to a previous state. Available beginning with Windows Installer version 4.0. | 0x674 | 0x80070674 |
| ERROR_ROLLBACK_DISABLED | 1653 | Could not perform a multiple-package transaction because rollback has been disabled. Multiple-Package Installationscannot run if rollback is disabled. Available beginning with Windows Installer version 4.5. | 0x675 | 0x80070675 |
| ERROR_INSTALL_REJECTED | 1654 | The app that you are trying to run is not supported on this version of Windows. A Windows Installer package, patch, or transform that has not been signed by Microsoft cannot be installed on an ARM computer. | 0x676 | 0x80070676 |
| ERROR_SUCCESS_REBOOT_REQUIRED | 3010 | A restart is required to complete the install. This message is indicative of a success. This does not include installs where the ForceReboot action is run. | 0xBC2 | 0x80070BC2 |
Any installer that uses standard MSI technology will likely use these same error codes(i.e the Microsoft C++ redistributables (vcredist_x86.exe, vcredist_x64.exe)).
Sending a Project to the C# Interactive Window in VS 2015 Update 2
Visual Studio 2015 Update 2 is currently in release candidate was just released and one of the cool new features is the ability to send a project to the C# interactive window.
This allows you to right click on a project and send it to the interactive window and then utilize the classes and methods in that project from the interactive window. This can be very useful if you just want to do some quick prototyping or testing of your methods.
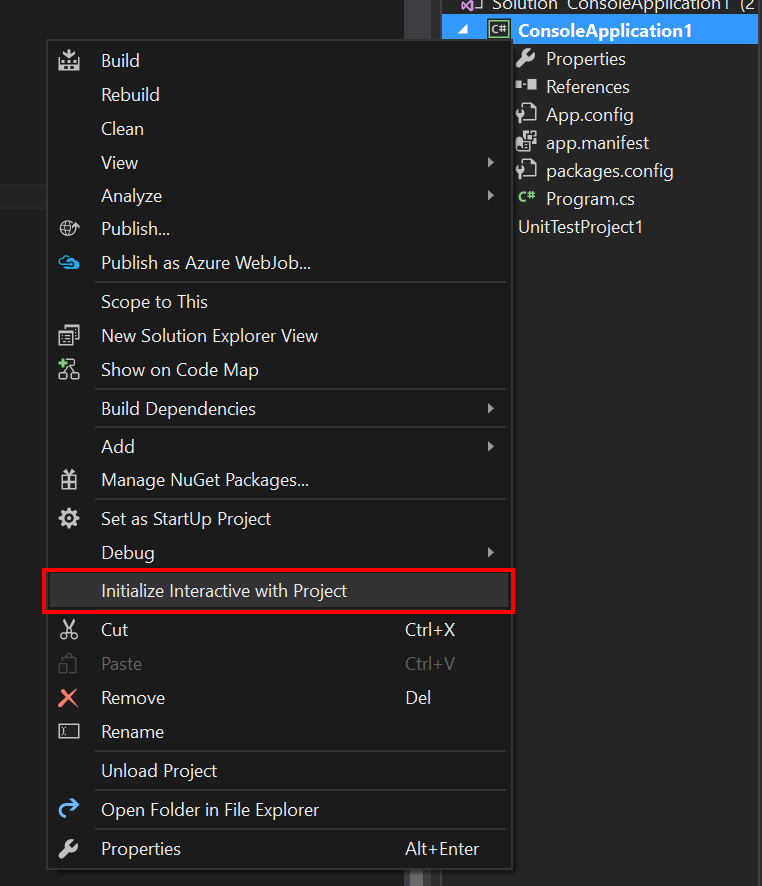
To enable this functionality, right click on your project and select the Initialize Interactive With Project menu item.
You'll see it build your project and then add all of the dependencies and the project as a reference to the interactive window.
> #reset
Resetting execution engine.
Loading context from 'CSharpInteractive.rsp'.
> #r "C:\Program Files (x86)\Reference Assemblies\Microsoft\Framework\.NETFramework\v4.5.1\System.dll"
> #r "C:\Program Files (x86)\Reference Assemblies\Microsoft\Framework\.NETFramework\v4.5.1\System.Core.dll"
> #r "C:\Program Files (x86)\Reference Assemblies\Microsoft\Framework\.NETFramework\v4.5.1\System.Xml.Linq.dll"
> #r "C:\Program Files (x86)\Reference Assemblies\Microsoft\Framework\.NETFramework\v4.5.1\System.Data.DataSetExtensions.dll"
> #r "C:\Program Files (x86)\Reference Assemblies\Microsoft\Framework\.NETFramework\v4.5.1\Microsoft.CSharp.dll"
> #r "C:\Program Files (x86)\Reference Assemblies\Microsoft\Framework\.NETFramework\v4.5.1\System.Data.dll"
> #r "C:\Program Files (x86)\Reference Assemblies\Microsoft\Framework\.NETFramework\v4.5.1\System.Net.Http.dll"
> #r "C:\Program Files (x86)\Reference Assemblies\Microsoft\Framework\.NETFramework\v4.5.1\System.Xml.dll"
> #r "ConsoleApplication1.exe"
> using ConsoleApplication1;
>
My console application has an Add method in the Baz class. To use it, I can simply do the following:
> Baz.Add(4,5)
9
As you can see, this new functionality is moving closer to what is available in the F# interactive window and I hope to see more developers grab onto this functionality to improve their development workflows, as it can really change the way you work.
Searching and Filtering Tests in Test Explorer
If you take a quick glance at the Test Explorer window in Visual Studio 2015, you might not notice all of the power that you have in that little window. To start, there is a grouping icon, that allows you to group your tests by various properties. The grouping is a great way to get common tests together so you can easily select them and run them in test explorer.

You have the option to group by:
| Group By | Description |
|---|---|
| Class | This will group by the class name to which the test belongs. Note: This is not the fully qualified class name, so if you have multiple classes in different namespaces with the same name, they will be hard to differentiate. |
| Duration | This will group by the duration of the last test run. It uses 3 categories when grouping (Fast < 100ms, Medium > 100ms, and Slow > 1 sec). |
| Outcome | This will group by the outcome of the last run of the tests. It uses 3 categories when grouping (Passed Tests, Failed Tests, and Skipped Tests). |
| Traits |
This will group tests based on the TestCategory, Owner, Priority, and TestProperty attributes assigned to tests. Note: Tests can have multiple trait attributes assigned to them and thus a single test could appear multiple times in this view.
|
| Project | This will group tests by the project to which they belong. |
While the grouping is nice, the real power in this dialog is the search feature. From the documentation, you can search on the following:
| Qualifier | Description |
|---|---|
| Trait | Searches both trait category and value for matches. The syntax to specify trait categories and values are defined by the unit test framework. |
| Project | Searches the test project names for matches. |
| Error Message | Searches the user-defined error messages returned by failed asserts for matches. |
| File Path | Searches the fully qualified file name of test source files for matches. |
| Fully Qualified Name | Searches the fully qualified file name of test namespaces, classes, and methods for matches. |
| Output | Searches the user-defined error messages that are written to standard output (stdout) or standard error (stderr). The syntax to specify output messages are defined by the unit test framework. |
| Outcome | Searches the Test Explorer category names for matches: Failed Tests, Skipped Tests, Passed Tests. |
Let's take an example. Say I have the following tests in my system (implementations removed for brevity):
[TestMethod]
public async Task TestMethodNone()

[TestMethod, TestCategory("Unit")]
public async Task TestMethodUnit()

[TestMethod, TestCategory("DAL"), TestCategory("Unit")]
public async Task TestMethodDALUnit()

[TestMethod, TestCategory("DAL"), TestCategory("Unit")]
public async Task TestMethodDALUnit2()

[TestMethod, TestCategory("DAL"), TestCategory("Integration")]
public async Task TestMethodADALIntegration()
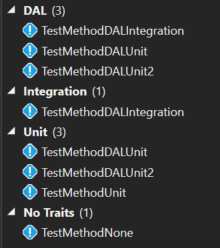
If I group by trait and don't filter anything, then I'll see the following tests:
Next, I could filter the tests by specifying I only want tests with the Unit trait. The search term would be Trait:"Unit":
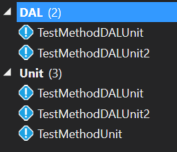
I can also filter to only show tests that are both DAL and Unit tests by using the search term Trait:"Unit" Trait:"DAL":
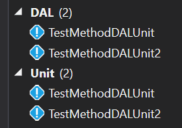
If I want to exclude tests with a given attribute, I could exclude all DAL tests by using the minus symbol, so my search term would be Trait:"Unit" -Trait:"DAL":

You can also pair this with other searchable attributes on the tests. So, after a test run, if I want to find all unit tests that failed, I could use the search term Trait:"Unit" Outcome:"Failed":

As you can see, the grouping and filtering available to you in the Test Explorer window is pretty robust; it just takes a little time to dig into it and learn the syntax. The Run unit tests with Test Explorer article on MSDN gives a lot of good information on this topic and is a worthwhile read if you are using this window in your day to day work. Thanks to William Custode for asking a question on StackOverflow that gave me inspiration for this blog post.
Editing Files on your Azure Hosted Wordpress Site
I host this blog on Windows Azure using WordPress. There have been times where I needed to edit my web.config file or manually remove some plugins that were causing trouble. After searching around quite a bit, I found that the easiest way to do this is to use Visual Studio Online to edit the files in my hosted site.
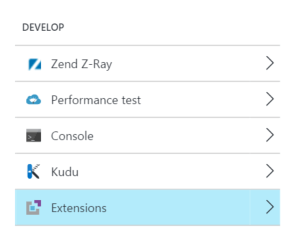
To start, you need to add the Visual Studio Online extension to your Web App. To do this, select the tools option from your Web App and select the Extensions menu in the Develop section.
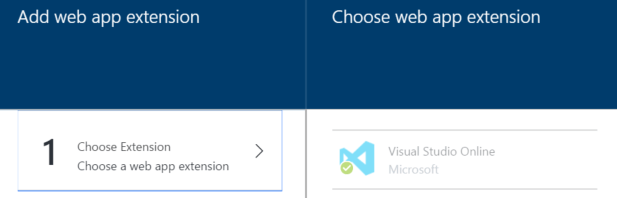
Next, select the Add button to add a new extension.

Select Choose Extension and find the Visual Studio Online extension.
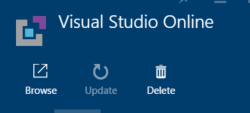
Once installed, you can then select the Visual Studio Online extension from the Extensions view and select the Browse button. This will launch a new window from which you can explore the contents.
For, example, you can select and open your web.config file and quickly make changes to it.
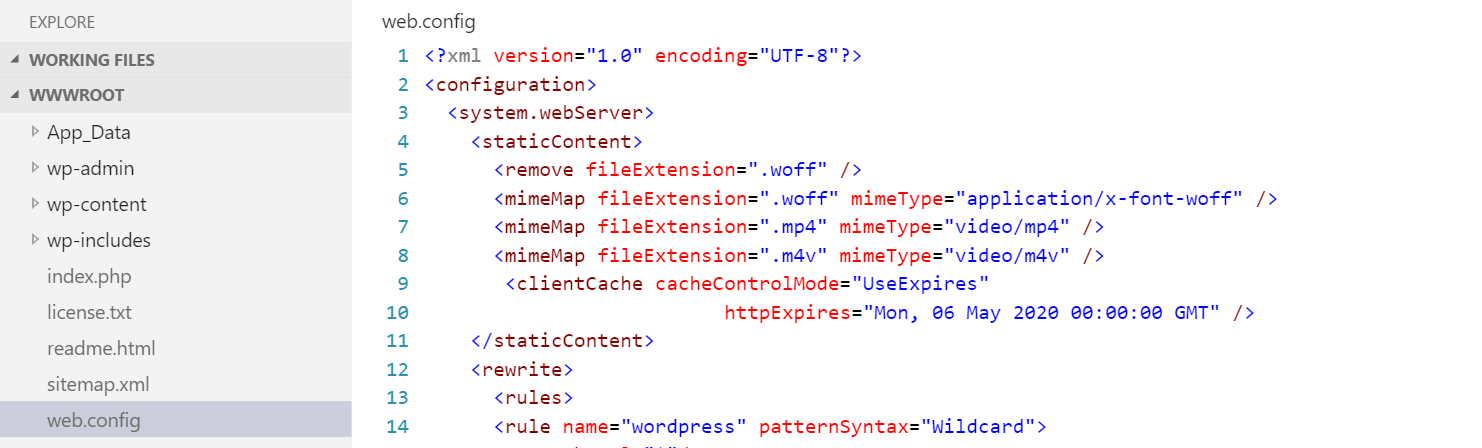
I have found this tool useful a few times, allowing me to enable woff files and to enable SSL on all pages. Hopefully you find it as useful as I do.
What does Environment.OSVersion return on Windows 10?
Unfortunately, the answer is, it depends.
Consider the following code:
Console.WriteLine(Environment.OSVersion.ToString());
Depending how you execute the code, you may get differing results:
| Visual Studio Version | Project Type | Output |
|---|---|---|
| 2015 Update 1 | Console App |
Microsoft Windows NT 6.2.9200.0
|
| 2015 Update 1 | Unit Test |
Microsoft Windows NT 10.0.10586.0
|
| 2015 (No update 1) | Console App |
Microsoft Windows NT 6.2.9200.0
|
| 2015 (No update 1) | Unit Test |
Microsoft Windows NT 6.2.9200.0
|
So, how can we get our console application to be consistent with the test application in VS 2015 update 1? The key is manifest files. According to the Operating System Version documentation:
For applications that have been manifested for Windows 8.1 or Windows 10. Applications not manifested for Windows 8.1 or Windows 10 will return the Windows 8 OS version value (6.2). To manifest your applications for Windows 8.1 or Windows 10, refer to Targeting your application for Windows.
So we can add a manifest file to our console application to specify Windows 10 compatibility:
<?xml version="1.0" encoding="utf-8"?>
<assembly manifestVersion="1.0" xmlns="urn:schemas-microsoft-com:asm.v1">
  <assemblyIdentity version="1.0.0.0" name="MyApplication.app"/>
  <compatibility xmlns="urn:schemas-microsoft-com:compatibility.v1">
    <application>
      <!-- Windows 10 -->
      <supportedOS Id="{8e0f7a12-bfb3-4fe8-b9a5-48fd50a15a9a}" />
    </application>
  </compatibility>
</assembly>
Now, when we run the console application, we get the output of Microsoft Windows NT 10.0.10586.0
So, what changed in Visual Studio 2015 Update 1? This is speculation, but I am guessing they added a manifest to the executable the runs the unit tests behind the scenes, which caused the Environment.OSVersion to return the new value for Windows 10. As the documentation states:
Identifying the current operating system is usually not the best way to determine whether a particular operating system feature is present. This is because the operating system may have had new features added in a redistributable DLL. Rather than using the Version API Helper functions to determine the operating system platform or version number, test for the presence of the feature itself.
So, if you plan on using Enivronment.OSVersion in the future, be sure to understand the different values it could return depending on how the code is hosted.
Unable to Resolve DNX Dependencies on OSX
I was building dot net core console applications on OSX and ran into an issue where certain core dependencies were not resolving when running dnu build. The error output I would get would be:
Building ConsoleApplication2 for DNX,Version=v4.5.1
  Using Project dependency ConsoleApplication2 1.0.0
    Source: /Users/john/Dev/ConsoleApplication2/project.json

  Unable to resolve dependency fx/mscorlib

  Unable to resolve dependency fx/System

  Unable to resolve dependency fx/System.Core

  Unable to resolve dependency fx/Microsoft.CSharp
  ...
After doing some testing, I found that if I specified the core framework (dnxcore50) to the build command, then it would work properly.
dnu build --framework dnxcore50
After doing some more digging, I found that I did not have the mono framework installed on the machine, and thus the v4.5.1 build was failing. To correct this, I simply had to install the mono framework using dnvm:
dnvm upgrade -r mono
After that, the dnu build works properly and I can continue on my way.
Parallel Test Execution in Visual Studio 2015 Update 1 Might Not Be What You Expect
In the Update 1 of Visual Studio 2015, it was announced that MSTest will support running unit tests in parallel. I decided to give this a shot and see exactly how it worked. I started by writing 8 unit tests that all looked like this:
[TestMethod]
public async Task TestMethod7()
{
    Console.WriteLine("1");
    await Task.Delay(5000);
}
Next, I added the RunSettings file to my project with a MaxCpuCount of 6:
<?xml version='1.0' encoding='utf-8'?>
<RunSettings>
  <RunConfiguration>
    <MaxCpuCount>6</MaxCpuCount>
  </RunConfiguration>
</RunSettings>
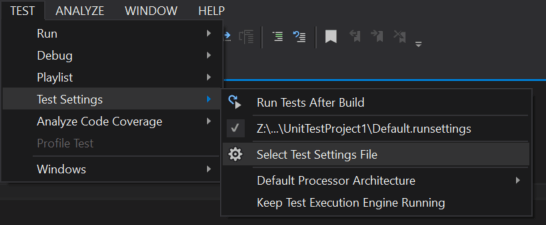
Finally, I selected my run settings file from the Test Settings Menu:
I ran it and all of my tests still ran in serial. I thought maybe I had done something wrong or perhaps hit a bug with the new feature, so I returned to the update 1 announcement and found my answer. It states:
Parallel test execution leverages the available cores on the machine, and is realized by launching the test execution engine on each available core as a distinct process, and handing it a container (assembly, DLL, or relevant artifact containing the tests to execute), worth of tests to execute.
The separate container bit is the piece I was missing. In order to get my tests to run in parallel, I needed to split up my tests into separate test assemblies. After doing that, I saw that the tests in different assemblies were running in parallel.
The distinction of tests running in parallel across assemblies is a subtle point that may cause confusion if you think just setting the MaxCpuCount in a run settings file is going to give you benefit on a single test assembly. Overall, I am glad to see that Microsoft is still improving MSTest and hopefully they continue to add features that will allow us to better parallelize our testing.
Update (2016-06-15) - I create a sample set of tests on GitHub to better demonstrate this functionality.
Recording your screen using Skype For Business
In this video, I demonstrate how to record your screen using Skype For Business.
The C# Interactive Window in Visual Studio 2015 Update 1
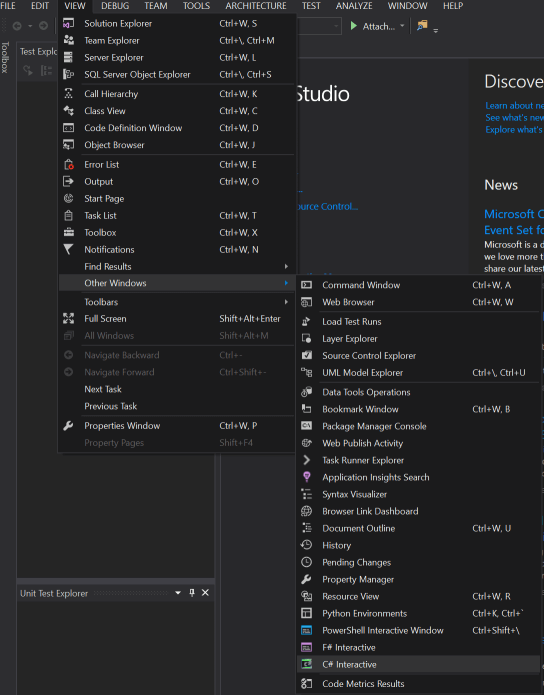
The next update of Visual Studio 2015 will contain the C# interactive window. This is a REPL that allows you to execute C# code. To access this, open the View=>Other Windows=>C# Interactive menu item.
Now that you have the window open, the first thing you should do is read the help, so you get the lay of the land. Type #help to get a list of commands. Here you can see some of the keyboard shortcuts for moving between various submissions and some commands to clear (#cls) and reset the window (#reset). Note that as of the current release candidate I am experiencing some issues with the arrow keys not behaving as described.
Now you can start typing valid C# code and it will be evaluated in the window. For example, I could type the following:
> var x = 1;
> x = x + 1;
> x++;
Each of these statements are evaluated and the value of x is maintained as it is mutated by these commands. Finally, I can type x and hit Ctrl-Enter or Enter twice to evaluate the value of x:
> x
3
You can also declare using statements inside the interactive window and then have access to all the members in the namespace.
> using System.Threading;
> Thread.Sleep(500);
You can declare functions inside the REPL by simply typing or pasting the function into the window.
> public int AddNumbers(int x, int y)
. {
.     return x + y;
. }
> AddNumbers(5,6)
11
If you need to load another DLL into the REPL, you can do that using the #r command:
> #r "Z:\Dev\ConsoleApplication29\bin\Debug\ConsoleApplication29.exe"
> using ConsoleApplication29;
> var x = new Something();
> x.DoSomething();
As you can see it is very easy to get going quickly with the C# interactive window and it provides you a quick way of prototyping your C# code. The REPL is used heavily in F# development and I think C# developers will find great ways to leverage it as part of their development workflows.
CPU Profiling in Visual Studio 2015 Update 1
In the past, I have covered the Diagnostics Tools and all of the new features that are available in VS 2015. With the upcoming release of update 1, some new features are being added to the diagnostics tools.
When you open the diagnostics tools, you'll notice the CPU Usage tab now shows you information like the Total CPU % and Self CPU %.
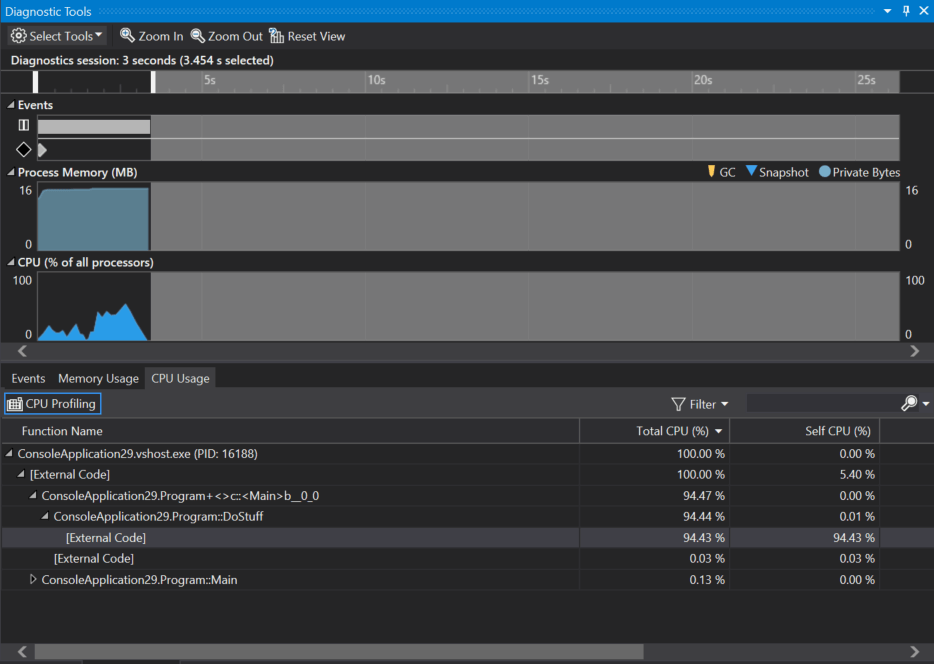
The total CPU % covers the method and all child methods that it calls, while the self CPU is limited to only the code within the method, excluding all child calls. Using these values you can quickly determine what are your most costly functions in terms of CPU %.
The CPU percentage also works with the range selection in diagnostics tools window. So, if you want to just hone in on one section of your app where the CPU is spiking, this tool allows you to do this.
[video width="1028" height="580" mp4="/content/DiagnosticToolsWithCPU.mp4"][/video]
Overall, I think this is a great addition to Visual Studio and I can't wait to see how people use it. If you want more in depth information on the new CPU features in the diagnostics tools, Nikhil Joglekar has a blog post that covers it in quite a bit of detail.
Creating a Code Analyzer using F#
Note: This article covers creating a C#/VB code analyzer using F#. At this time there is no Roslyn support for analyzing F# code.
In the past we have covered creating code analyzers using C# and VB. Creating an analyzer in F# is just as easy. I have just started the process of learning F# and figured an analyzer would be a great test project to learn on. There aren’t official templates for F# analyzers, but you can take the C# templates and use those as a starting point for F#.
To start, make sure you have the latest version of the .Net Compiler Platform SDK installed.
Next, you’ll want to create an “Analyzer with Code Fix (NuGet + VSIX)” project under the Visual C#->Extensibility group in the project templates.

Once you have the project created, add a new F# library project to the solution. With the new project added to the solution, you’ll next want to modify the VSIX project to deploy the F# project instead of the C# project. To do this, modify the source.extension.vsixmanifest file and go to the Assets tab. Switch the project on both the Analyzer and MefComponent to be the new F# library.

Now you can remove the C# analyzer and test project form the solution.
You solution is now set, but the F# project needs the appropriate references in order to work with analyzers. Add the Microsoft.CodeAnalysis NuGet package to the F# project.
Now we can start coding the analyzer. We’ll implement the same basic analyzer that comes with the C# samples, where it raises a diagnostic whenever there are lowercase characters in type names.
We’ll start creating our analyzer by importing some namespaces we’ll need later in the code.
namespace FSharpFirstAnalyzer
open Microsoft.CodeAnalysis
open Microsoft.CodeAnalysis.Diagnostics
open System.Collections.Immutable
open System.Linq
open System
Next we’ll declare our analyzer and inherit from the DiagnosticAnalyzer base class. Notice that we are registering our analyzer as a C# only analyzer.
[<DiagnosticAnalyzer(Microsoft.CodeAnalysis.LanguageNames.CSharp)>]
type public MyFirstFSAnalyzer() =
    inherit DiagnosticAnalyzer()
Now we can create a descriptor for our diagnostic and override the SupportedDiagnostics property to return our diagnostics.
let descriptor = DiagnosticDescriptor("FSharpIsLowerCase",
                            "Types cannot contain lowercase letters",
                            "{0} contains lowercase letters" ,
                            "Naming",
                            DiagnosticSeverity.Warning,
                            true,
                            "User declared types should not contain lowercase letters.",
                            null)

override x.SupportedDiagnostics with get() = ImmutableArray.Create(descriptor)
Finally, we can do our work in the Initialize override. We’ll create a symbol analysis function and check if the symbol has any lowercase characters. To do this, we’ll perform a match on the Symbol.Name. Finally we’ll register that function with the context passed into the Initialize method.
    override x.Initialize (context: AnalysisContext) =
        let isLower = System.Func<_,_>(fun l -> Char.IsLower(l))
        let analyze (ctx: SymbolAnalysisContext) =
            match ctx.Symbol with
                | z when z.Name.ToCharArray().Any(isLower) ->
                    let d = Diagnostic.Create(descriptor, z.Locations.First(), z.Name)
                    ctx.ReportDiagnostic(d)
                | _->()

        context.RegisterSymbolAction(analyze, SymbolKind.NamedType)
At this point, we can run the analyzer solution and a new Visual Studio instance will appear. This is referred to as the experimental instance and has completely isolated settings from the instance in which you do your main development. Create a simple C# console application and open the Program.cs. You should get a diagnostic on the Program class indicating it contains lowercase letters.

The full code for our F# analyzer is:
namespace FSharpFirstAnalyzer
open Microsoft.CodeAnalysis
open Microsoft.CodeAnalysis.Diagnostics
open System.Collections.Immutable
open System.Linq
open System

[<DiagnosticAnalyzer(Microsoft.CodeAnalysis.LanguageNames.CSharp)>]
type public MyFirstFSAnalyzer() =
    inherit DiagnosticAnalyzer()
    let descriptor = DiagnosticDescriptor("FSharpIsLowerCase",
                            "Types cannot contain lowercase letters",
                            "{0} contains lowercase letters" ,
                            "Naming",
                            DiagnosticSeverity.Warning,
                            true,
                            "User declared types should not contain lowercase letters.",
                            null)

    override x.SupportedDiagnostics with get() = ImmutableArray.Create(descriptor)

    override x.Initialize (context: AnalysisContext) =
        let isLower = System.Func<_,_>(fun l -> Char.IsLower(l))
        let analyze (ctx: SymbolAnalysisContext) =
            match ctx.Symbol with
                | z when z.Name.ToCharArray().Any(isLower) ->
                    let d = Diagnostic.Create(descriptor, z.Locations.First(), z.Name)
                    ctx.ReportDiagnostic(d)
                | _->()

        context.RegisterSymbolAction(analyze, SymbolKind.NamedType)
As you can see, creating an analyzer in F# is possible, and once you have the tooling setup, the development flow is not much different than that of a C# or VB analyzer. Overall, I think matching functionality in F# provides interesting possibilities when creating analyzers for Roslyn.